
Over the past 13 years that I’ve been coaching, we’ve gone through dozen of drills to help teach the catch and pull. Recently we came up with a new drill called ‘YMCA drill’.
We’ve been using this in clinics and camps for the past year with great success. We’ve found this drill is one of the simplest and easiest ones to help adults learn the four key phases of the catch and pull.
1. Start of the catch
2. High elbow catch
3. Power diamond
4. Hand exit
Transcription:
You might have seen the YMCA drill that we’ve featured before in a lot of our videos lately and over the course of the last five years, we’ve really changed the drills that we do to help swimmers learn and improve their catch and pull phase. The reason that we’ve changed over that time is we go with what works best, and in the last 12 months, one of the drills that we came up with and we started using, and we found it to be really effective and really simple, is YMCA drill. Now, the reason that we’ve moved to this drill is it can be very hard to improve your catch and pull just by trying to think about it while you’re swimming. It’s a hard thing to do because the motor patterns that you need to have a good catch can be difficult to develop just by swimming.
Yes, it’s certainly possible. It’s much easier to do if you start at a very young age and you swim a lot. But with most of the athletes that we work with, a good majority of those are swimmers and triathletes that are adults, that have never had a swimming lesson in their life. So to try and get them to just swim and improve their catch without breaking down the catch and the pull is a very difficult thing to do. So the drill that we came up with is YMCA drill. And that breaks down the catch and the pull into the four most important aspects of that part of the stroke.
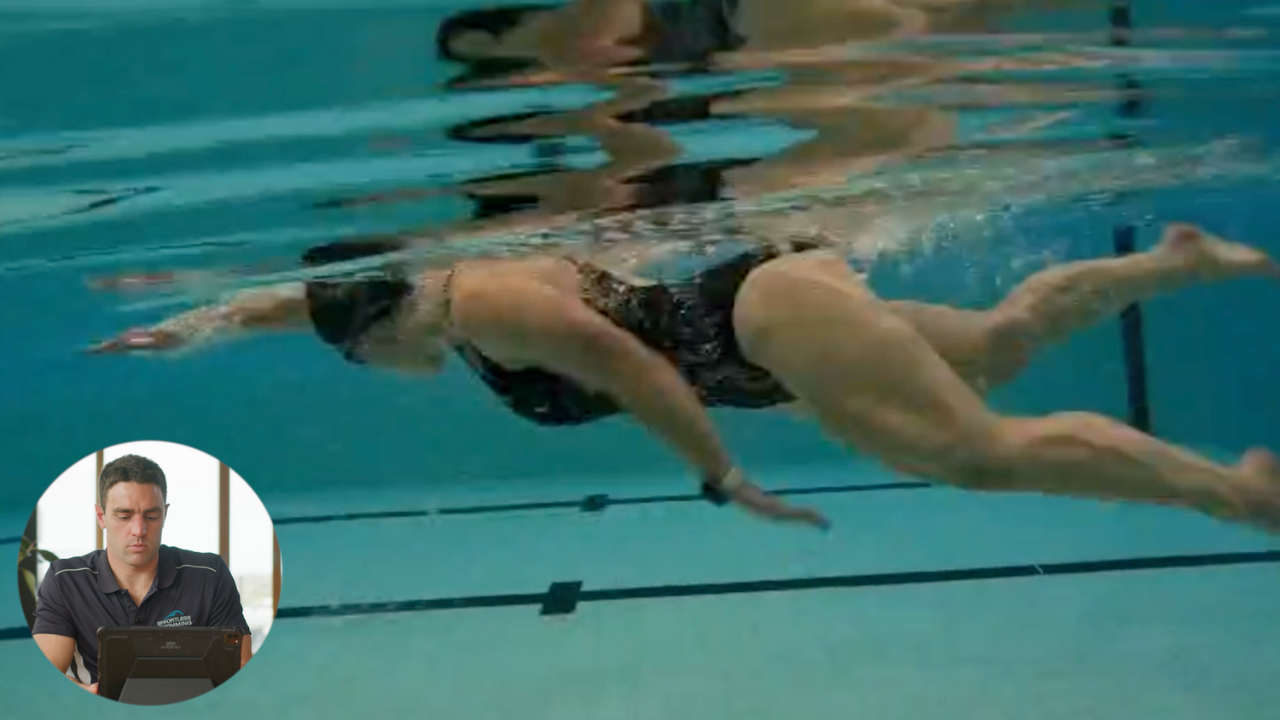
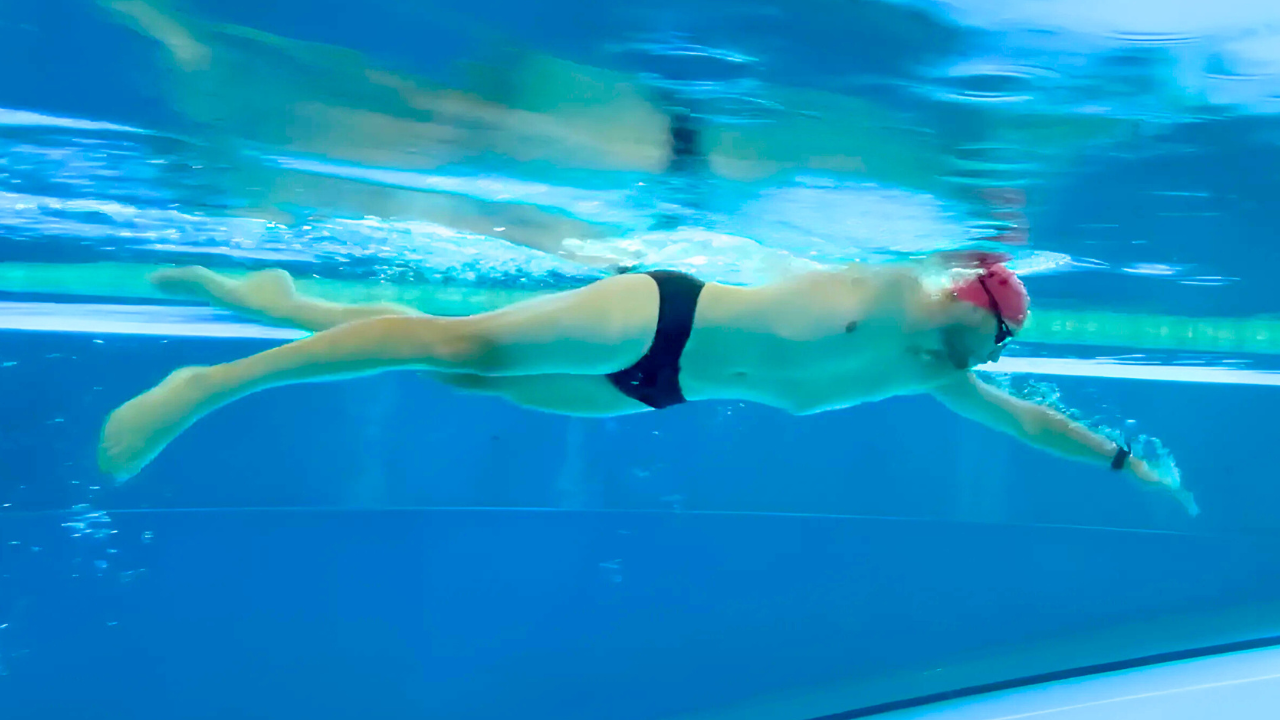
Those four aspects I’ll show you here with the Olympian Dan Smith. The first one is the start of the catch. This is when you’re at full extension, the arm is out in front of you. We should see the fingertips below the wrist, wrist below the elbow. And we want to see the fingertips just that little bit deeper than the shoulder. That’s the first position that we want swimmers to get to when they’re about to start their catch.
The second position that we want swimmers to get to is a high elbow position. Now, this doesn’t need to be extreme. This doesn’t need to be well over the top where it’s uncomfortable and awkward for swimmers, but this is the second position you want them to get to anywhere in that high elbow range.
The third position we want swimmers to get to is the power diamond. Now, if we look side on, we should see the shoulder, the elbow, and the hand completely aligned. So one, two, three, all of those things lined up. That’s what’s going to provide you with the most surface area to use to press back against the water.
If we look at that from the front, we should see the angle of the elbow 100 to 120 degrees, so it’s like a triangle on the side. The elbow should be the widest part of the arm. The hand should be on the inside of that elbow, and it looks like a triangle. That’s half a diamond. We call that the power diamond.
The fourth position we want swimmers to move through is the hand exit, where the thumb or the hand is exiting quite close to the upper thigh and it’s going a little bit further than the hip. So that’s the exit. They’re the four key positions that you see all those really good swimmers move through. And the reason that we came up with the YMCA drill is that drill gives you the time, the space to be able to perfect each of those four key positions and you get the feel and the awareness about what it’s like to be in those positions.
Then it’s going to be so much easier for you to move through those four positions when it comes to your swim stroke. Because all we’re looking to do here is develop the muscle memory to be able to do that in your swim stroke. But as we said, it’s very hard to do if you’re just trying to change your swimming by just swimming. So it helps to break it down. So with YMCA drill, what we encourage swimmers to do is wear a snorkel and put fins on for it, and then what you’ll do is kick for five seconds in each of these four positions. So five seconds at the start of the catch, five seconds in the higher work position, five seconds in the power diamond and then finally five seconds at the hand exit. And then you can just come back underneath the body and start again.
As we go through this drill, most people don’t get it right straight away. Some of the things that people don’t do right in this drill are, number one, their high elbow catch isn’t high enough so a lot of people will drop their elbow when they’re in that second position, that high elbow position. It’s actually good to exaggerate that high elbow position for this drill. Not that you need to do it when you swim necessarily, but it is good just to get a feel for what we want to achieve here.
The second thing that most people don’t get right in this drill when they first do it is in their power diamond phase. If we look from the side, the shoulder, elbow, and hand aren’t aligned. Most people, their hands come too far back, well past their shoulder and so everything isn’t lined up. That’s probably the second most common mistake that we see.
The last one is with the hand exit. A lot of people have got their arms fully extended and their palms facing the sky, which we don’t want. We want to keep the palms facing back behind you, kind of towards your feet there with just a little bit of bend in your elbow, because that’s how you’re going to exit the water. There are some intricate details there. Some nuances to this drill and when people join our membership and they send me videos to analyze, I actually get them sometimes to send a video of them doing this YMCA drill because we want to make sure that they’re doing all of these things right because it’s easy to have one or two things not in place.
Yes, it’s being picky. Yes, we’re really being quite particular about how we want these things done, but it’s these little 1% changes that you make in your stroke and sometimes in these drills, that are going to really translate and add up over the course of the next three to six months time.
So that’s YMCA drill and that is why we do it. Because if you want to develop the motor pattern to be able to have a very effective catch and pull, which is the 80/20 of your strokes. That 20% of the stroke that can really make 80% of the difference, you’ve got to break it down into smaller movements. Perfect those, get those right and then just continue to build up the stroke and then build up to that full stroke.
So that’s why we do the YMCA drill. Now there are two other drills that we do at clinics, and they’re also inside our video membership. They are the intermediate ones between YMCA and the full stroke, but you can get a lot done. You can really improve a lot with that YMCA drill if you know what you’re doing.
Another tip that can help you as you do this drill when people first do it, they’re often very tense and very stiff. And if you want to try and change your stroke and change something, you’ve got to stay relaxed as you do it. You’ve got to be relaxed with your breathing, relax with your hands and your forearms and your arms. But most people are very stiff as they do the drill. So if you can hold just enough tension throughout your arms and your hands to keep the position in the form, then relax from there, that is all you need. And that’s actually going to make it so much easier to change something. Because if you’re really trying to fight against it, good chance it’s not going to translate into your stroke. So that is YMCA drill. I’m going to play through the full drill now with my explanation of it, and you can see how we do it.
Now, how could you use this as part of your training? How can you implement it? What we recommend, do some drills in your warm-up. It doesn’t need to be a whole lot, 200, 300 meters of some drill, swim work in your warmup. Set yourself up with good technique. Take that into your mindset. So that’s what I would recommend. Here’s the YMCA drill. I hope you enjoyed it. If you do have any questions, put that below. I’ll answer as many as I can and this is really one of my favorite drills. Yes, we made it up. It’s similar to some other drills you may have seen before, but I think this is the best way for most adults to improve their catch and their pull.
YMCA drill helps you get a feeling for the four most important positions to move through in the freestyle catch and pull. The first position is with the arms out in front of you, and this is where you’re going to start the catch and you want your fingers lower than your wrist, wrist lower than your elbows and elbows lower than your shoulders.
Hold that position for four or five seconds. Then move into the second position, which is the high elbow catch. Here the fingertips will be pointing down to the bottom of the pool and your upper arm and elbow won’t have moved much from that first position. This is roughly where you want to get to with your arms as you are going through the catch in freestyle.
The third position is where the shoulder, elbow and hand, all the line underneath the shoulders if you’re looking from the side. And if you’re looking from the front, they’re going to make this diamond shape. This is the power diamond that we talk about in freestyle, and this is when you are going to be really using your lats throughout the stroke.
The last position is near the exit and this is where the hands will be next to the hips. The palm should be facing behind you in this phase of the stroke to complete that press back past the hip and maintain that propulsion.
A lot of swimmers will let their palms face up to the surface, but make sure they stay back behind you and the elbows will have a little bit of a bend in them because for you to get your arm out comfortably and easily, you’ve got to make sure that there’s a bit of bend there. So it’s a bit of a funny position, but it will help you get the hand out and I’m over the top a lot easier. It’s called YMC because your arms roughly make those letters as you go through it.
The Y position is with both hands out in front. The M is in that high elbow catch, and if you’re looking from the front, it looks a little bit like an M. The C is in that power diamond position. If you were to turn it on the side, it’s a bit like a C. And the A is roughly the letter that the arm will make in that last position there. So YMCA drill. One of the best drawers you can do to change your muscle memory and get a feel for those four key aspects of the stroking positions that you want to eventually move through as you go through the freestyle catch and pull.