
We have compiled the best of our Feedback Friday videos.
Transcription:
What we like to teach is to activate the core. So to switch that on, where I like to think about it as you’re drawing your belly button into your spine. Then we want to keep the legs fairly straight with the kick. We don’t want to be bending the knees too much. You want to keep the kick fairly straight. I like to think about it as almost squeezing your bum cheeks together, activating your glutes, activating your hamstrings a little bit as well, just to keep the legs a little bit straighter in the upkick. What we see with a lot of people is they bend their knees too much, they focus too much on the down kick as opposed to just keeping a small and narrow kick out the back.
You can see in the first video, as she’s entering and extending forward, the fingertips, the hands, the wrist, they all stay very high as she’s extending out in front. What we like to try and get to is the position where the fingers are slightly lower than the wrist, wrist is slightly lower than the elbow, as you’re entering and extending forward. This allows you to start the catch. This allows you to start pressing back on the water a little bit sooner, as opposed to pressing down on the water or putting the brakes on when those fingertips come up. This is probably one of the biggest things that have helped her take off those 20 seconds. Because when someone comes to us and they’re doing this, it’s slowing them down so much.
When we go through some of the drills, like some of the sculling drills, some of the kicking drills, we get them to practice doing the right thing and the wrong thing. The right thing is fingers below wrist, wrist below elbow. They find out when they go through some of these drills in the wrong position, there’s so much drag, so much resistance created out in front. So if we can just get you to enter and extend in that position there, with that nice long line out in front, where you should feel the water coming just over the top of your fingertips when you’re extending out in front there. That sets you up so much better for the rest of the stroke.
Today’s video, we’re looking at the high elbow recovery, and that’s a term that can easily get misinterpreted. It can impact a lot of swimmers’ strokes, just because they’re trying to overdo the high elbow recovery.
Now, you can see here that the swimmer coming towards us, look at his right arm coming over. His hand is just a little bit too close to his body or a little bit too low, which is causing him to be a bit restricted through that right shoulder in the recovery phase of stroke, as that right arm comes over.
Now, for a lot of elite swimmers or junior swimmers who have got really good flexibility and mobility through the upper thoracic and through the shoulders, that recovery would be fine. But that recovery for a lot of adults who don’t have that same sort of mobility through the shoulders, it can just impact their recovery, which can cause them to get jammed up through the shoulders and ultimately, throw their balance off and also lower their stroke rates or lower than what they should be.
What we look to do here is just to get that right hand going out a little bit wider. Don’t try and come too close to the body. If you feel like you’re getting jammed up through the shoulder over the top, you might be trying to come back too far with the elbow, or come too close to the body with the hands. So get them to go out a little bit wider.
You can see in this next video, he’s a lot freer to get over the top. That sort of open, relaxed recovery allows him to get the stroke rate up a bit faster. And he’s in his natural range of motion. So as soon as you sort of getting into that position where you’re restricted, it’s not very natural for you, then it’s going to either impact your balance, your line, your posture, or just your ability to relax and swim faster.
With this more open recovery, it’s a lot easier to recover with a wetsuit on as well. For a lot of the people that we work with, they’re triathletes or open water swimmers, and they are swimming with a wetsuit on. You’re already going to be restricted with a wetsuit on. But if you try and have a recovery like he was doing in that first video with the wetsuit on, you’re going to find it very hard to come over comfortably, and you’ll probably fatigue a lot sooner than what you would otherwise. So go for a more open recovery. It’s okay to come over a little higher and a little wider than what you might expect.
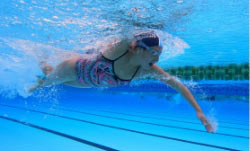
You can see in this video here of Katie Ledecky, how her left hand comes around quite wide. Then on her right arm, so the side that she breathes too, she comes over quite a bit higher. But still, that hand is out a lot wider than what we saw in that video. So even elite swimmers, their recovery isn’t going to be very close to the body. You see it with some, but not with everyone.
Today, we’re looking at your breathing timing in freestyle, and how to tell if you’re breathing too late in freestyle. The first video we’re going to look at is of someone who’s breathing late. They’re turning their head a little too slow or a little too late. So they’re just missing out on the timing. This timing is just throwing the rest of their strike timing out.
If we look at the video of someone who’s getting their breathing timing right, you can see that the very first thing that we need to do is when your hand enters on the opposite side to what you’re breathing, that’s when you start to turn your head. You can see, as the right hand enters, the head begins to turn to the left. That’s your cue. Hand entry, start to turn.
Then when we want to bring our head back into the water is when we start to catch the water, we start to pull the water with that arm. So we want to be able to kind of put that in motion. We want to put those two together, where we start to pull through, we’ll start to catch, the head snaps back into the center. So you do that quite quickly and with a bit of assertiveness and forcefulness to snap it back into the center.
And that hip will drive back down, and you get to kind of anchor against that hip. That’s what kind of gives you the stability to pull against something. That’s what the best swimmers in the world do. They time their stroke and their breathing, and they actually kind of get quite a bit of momentum and force out of that, their head coming back into the water.
If we look at that first video, you can see here if we want that first cue to happen, which is when the hand enters, we want to start to turn our head. You can see he’s just doing it a little bit too late, so he’s missing that timing. Then you can see how he’s looking up and out of the water for too long while that other arm comes over. He’s already pulled through too far with that left arm before he starts to snap his head back into place. So just losing some of that rhythm and momentum that we want, and not quite getting as much sort of propulsion or not really vaulting over that left arm out the front.
Just the timing of your breathing can throw out a lot of other aspects of your stroke. So think about those two cues, which is when the hand enters, that’s when you start to turn your head, and then when you want to turn your head back around is when you start to pull through or start to catch on that arm that had entered out in front.
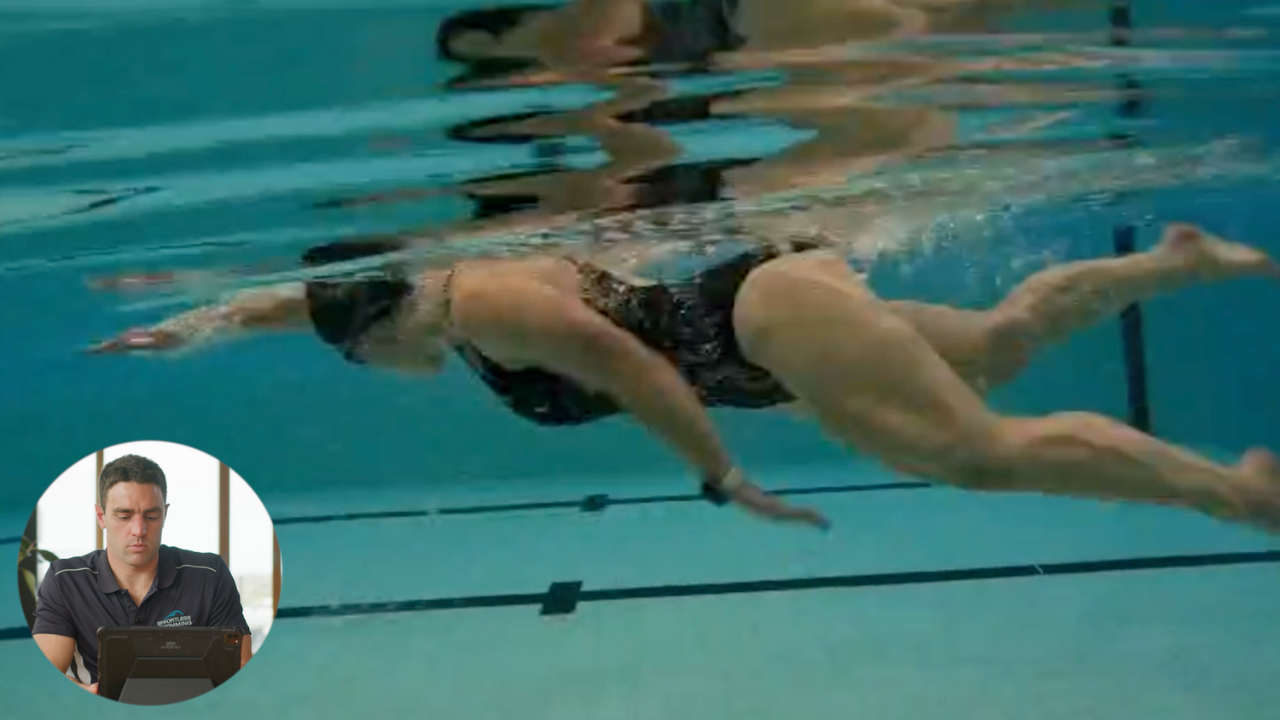
Today, we’re looking at posture. This is something that is fundamental to fast swimming, but it’s something that not a lot of new swimmers know about or often do the right way. Now, what we’re looking at here is the side on view of someone swimming. What we look to do is try and keep the back and the neck very long and straight. So in that straight position, it’s going to be a lot more efficient than if you’ve got a big arch through the lower back.
When we run clinics or in our membership when we do analysis for people all over the world, one of the first things I look for is how’s their posture. We want to try and keep their spine long and straight, and keep that straight line all the way up through their neck.
You can see in this first video how there’s quite a big arch in the lower back. That causes extra drag and resistance in a couple of places. Firstly, on their chest. It opens up more of their chest or their torso to that oncoming water, so they end up taking up a bigger space. The second area that adds resistance is on their quads. On top of their thighs, you can see that the legs end up sitting just a little bit low. The other place is kind of on someone’s bum or the top of their hips. There you can see how there’s a pool of water that sort of sits where that arch in the back is. Again, it’s just extra effort, the extra energy that you need to use in order to overcome that drag and resistance.
What causes it? Well, in this case, the head position is a big one. When someone’s looking too far forward, it will generally put them in that posture where there’s too much of an arch in their lower back. So for most people, we like them to look either straight down or slightly further forward, up to around 45 degrees. Each person’s different and it depends on what you’re training for. But anywhere within that range is fine. But generally, keep an extended neck. As soon as you let any creases come in that neck or the chin is too far forward, then it’s going to cause your posture to go away from that straight and extended position.
When it comes to the exit phase of the stroke when the hand’s coming out of the water, the two things I like to keep in mind are number one, we want the forearm and the hand to be pressing back against the water. When you’re pressing back on the water, that’s going to move you forwards. The second thing I want you to think about is you want to be able to come out of the water in a way where you… It’s almost like when you finish that exit from the water, it’s moving straight back into the recovery in a very relaxed, rhythmic manner. If you get caught up out the back of the stroke, then you’re probably going to find it quite hard to come over the top.
We’ve got two videos here to look at. The first one is the swimmer is pushing back too far under the water. So that last phase of the stroke, you can actually see how the forearm and the hand end up pressing up towards the ceiling, up towards the sky. When you push up, that’s going to move your hips or your body down. So we’re not being as effective as we could be in that last phase of the stroke. So yes, that stems from going too deep early on and even possibly coming under the body in the pull through. So yeah, there are some other causes to it, but it’s just something I want you to keep in mind.
Now, in this video here, this is what we want to be doing, where you can see out in front how the swimmer doesn’t go quite as deep with his pull through. If you think about the pull phases, if we look at the elbow, it should almost float up towards the surface as we move through the pool. That’s a phrase that Karlyn Pipes, who’s another swim coach, she likes to use. I think it’s a really good way to describe it. Once you’re into the catch, the pull phase, the elbow should almost float up towards the surface. You see that in this video, where the swimmer is coming out of the water really well.
Now, the second video we’re looking at here, the swimmer is just coming too close to their body in their recovery phase. Instead of exiting the water by pressing back just past the hip and brushing their hip with their thumb and coming over the top in a very open manner, they’re coming close to their body with their hands. So he’s just getting caught up. He’s actually finishing almost at past his hip on most of these strokes. But because he’s trying to come over very close to the body, that’s where he’s getting caught up.
Think about it as in your recovery phase, when the arm comes over the top, try and lead a bit more with the elbow. So when your arm’s coming over, the elbow is a thing where the effort and the energy will partly be coming from to lead your hand over the top of the water. If the effort and the energy is coming from the hand in that phase of the stroke, you’re probably either going to come too close to the body, or you’ll find that the elbow tends to drop, or you’re coming over in a way which is going to cause you to lose balance.
One of the most evident things you can see from the side here that’s going to help him improve is if we can just improve his alignment and get his feet a little bit closer together or his legs a bit closer together when he’s kicking. When the legs tend to splay out wide, like you can see here, 9 times out of 10 it’s a counterbalance to what the arms are doing. When you see someone whose legs aren’t kicking small enough, then it’s often what the arms are doing out in front.
If we look at the front view here, you can see that on the entry, his hand direction is coming across the center on entry, and then he’s crossing the midline, so the middle of the head, and then he’s kind of going out a little bit too wide and pulling underneath his body but in a very wide position there. That sort of side to side movement where he comes into the center and then out too wide, that’s causing the legs to splay out the back. When the legs splay out the back, it’s an extra drag, extra resistance. We want to make it like we’re swimming down a very narrow corridor. If we can just tighten things up a little bit, narrow things up so we can just fit into that smaller space like we’re swimming down a narrow corridor or a narrow hallway, then we’re going to be more efficient.
The first thing that you’ll probably notice here is on the entry is he’s entering a little bit too far out in front of his head, which is causing him to keep his hand a bit too high for a bit too long in the extension phase of the stroke. A lot of our Feedback Friday videos have been on the recovery and the entry, because more times than not if you don’t set up the stroke correctly from on top and with your entry, then the catch and pull is going to be impacted. That’s why we normally look at this from the full aspect of how they’re recovering, how you’re entering and extending forward, and then how’s your catch and pull looking. Because if you don’t set it upright, very hard, sometimes, to get the rest of the stroke right.
What we worked on and what he did a pretty good job of doing is entering a little bit earlier. Getting the fingers in first, making sure the elbow’s slightly elevated while the fingertips are entering, and then getting the last bit of extension and reach happening in the water. What that helped him to do was to make sure that when he finished reaching forwards, his fingers were a little bit deeper than his armpit. We like to set up the catch. We like to finish reaching forwards with the fingers below the wrist, wrist below the elbow.
Now, it can feel quite deep compared to what you’re used to if your hand does stay too high in the extension phase of the stroke. So just be aware that it’s going to feel quite different and it might even feel like you’re not holding or feeling the water as much as you were before. Because when the fingertips are too high as you’re extending, you’ve got pressure on the bottom of your hand and the bottom of your forearm. That can feel like you’ve got a good hold of the water. But it’s not pressing you in the right direction. It’s putting the brakes on. It’s slowing you down. So that’s why we want to set up the catch with fingers below the wrist, wrist below the elbow.
The first thing that you’ll see here, this is the first video that we took when we first met up, a couple of things will stand out to you. The first thing is body position. You can see his legs and his hips are sitting quite low in the water. Some of it’s caused by his recovery. Some of it’s caused by his lead hand not staying out in front long enough. Also, the breathing too. You can see he’s looking up quite high there. If we cut to this position here, you’ll see with the breathing, right? Probably just looking up a little bit too high.
Also from the side here. One of the most obvious things you’ll see here is that left arm isn’t staying out in front long enough. So he doesn’t have that left arm to really balance on while he’s taking the breath.
What we wanted to work on was the timing of the stroke. The timing that we want for most people, especially anyone doing more than really 200-meter races, is we want this three-quarter catch up type of timing. Which is as the hand’s entering here, the other arm should be somewhere around here. You can see here on this side, so as his left hand comes in, timing here is not too bad. One hand entering there, the other hand pulling through past the shoulder. But if we look at the other side with this left arm pulling through the breathing side, you can see here that right hand enters now, but his opposite hand all the way back at his hip. It just means that he’s going to lose balance.
If we look from the top view here, you can see there, right now there are no hands out in front of his head. That just means the weight of the legs is going to take over. That’s a big cause of why his legs are sinking. So if we can start to keep this left hand out in front for slightly longer, give him a bit more balance, change the balance of his body in the water, that will help bring the legs up and get the heels out of the water every couple of kicks there.
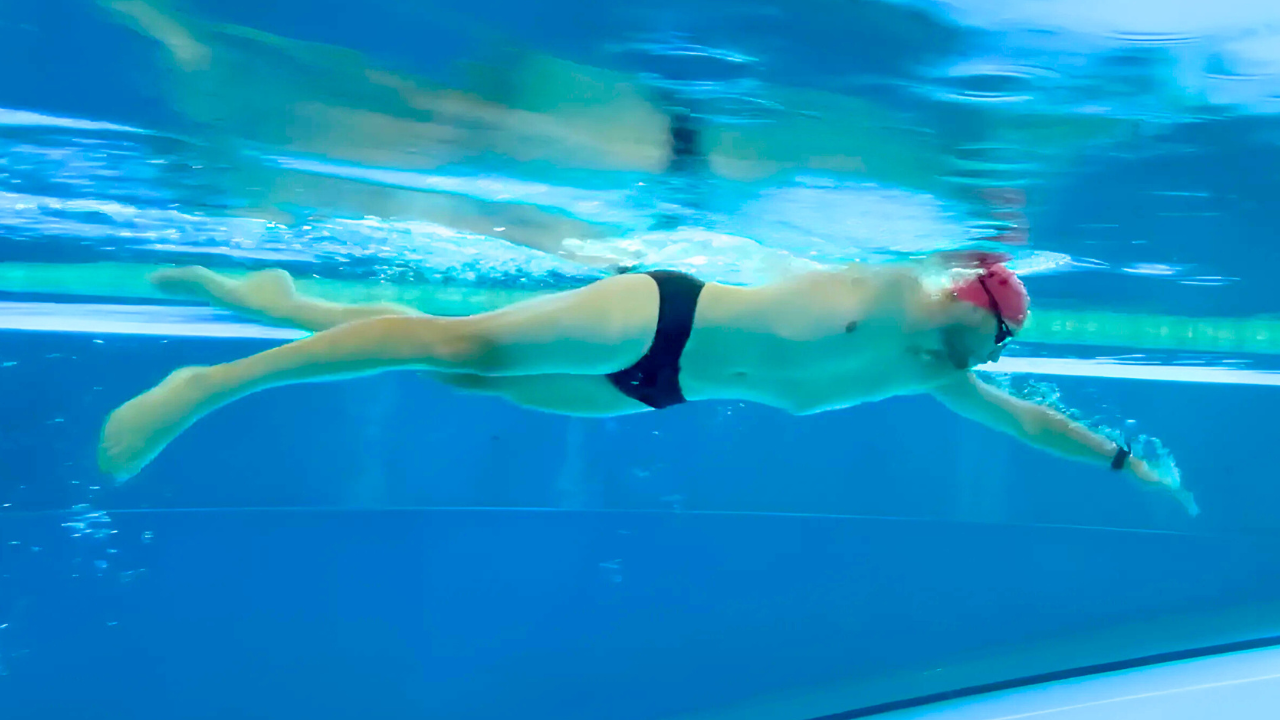
Now, you will see that the body position looks quite good. We’ve got the head, hips, and heels at the surface. So he doesn’t need to really change much with that. You will notice though through his body it’s not as straight as it could be, in terms of his head, his body, and his legs. There’s a bit of curve, maybe a bit too much curve through the lower back and through the hips. What that indicates to us is we’d probably want to straighten that out a little bit, because it’s going to be a bit less drag if we can hold a slightly straighter position through here. And he’s going to have a better connection through the body if we can get rid of that extra arch through the lower back and that extra bend through the hips and through the waist there. Because we want to try and keep that a little bit straighter to do all of those things.
One of the things that can really cause the arch in the lower back and that bend through the body to happen is the head position. If someone’s looking too far forwards, then that’s really one the key things. You can see it really standing out here. Where his vision is is almost directly out in front. When you’ve got this big kink through your neck there, it’s very hard to keep that lower back straight and to have the ideal, the best sort of connection through the core and connection with the rest of the stroke.
The first thing we’d probably want to do here is just to adjust the head position. Because you can see he’s breathing very comfortably there. He doesn’t look like he’s running out of breath. He’s getting that breath low, bottom goggles in the water. All of that looks really good.
With his head position, what should he aim for? You know that we typically like to aim for 0 to 45 degrees. Depending on what this swimmer is training for, he might want to aim for somewhere out in front there, as long as he’s keeping the back of his neck extended and long.
If you can breathe deep and you can relax when you breathe, that’s going to make everything else feel a whole lot easier. Now, it looks here with this swimmer, there’s a good chance he might run out of breath a bit earlier and a bit sooner than what he should in terms of fitness. That can just come down to the way he’s breathing.
One thing that you’ll notice here is that because we don’t have the underwater view, we can’t see it as well, but there are quite a few bubbles coming out near his face there, which just indicates that he might be breathing out a little bit too much too early. Because if you exhale everything or you exhale hard in the beginning, then you’re not getting full use of that air that you’ve breathed in. So by the time you go to take your breath, you can feel like, “I’m stuffed. I’ve run out of breath already.”
What he might need to do here to just make the breathing feel easier, if he does tire a lot quicker, is just change the way that he’s breathing. So get the breath, then just… Amy Jones, who’s a coach, calls it adding a calmer, as in getting your breath, hold your breath for a split second, then you just have this light exhale while your face is in the water. It’s then when you’re turning your head to the side through there, that’s when you have that bigger exhale happening.