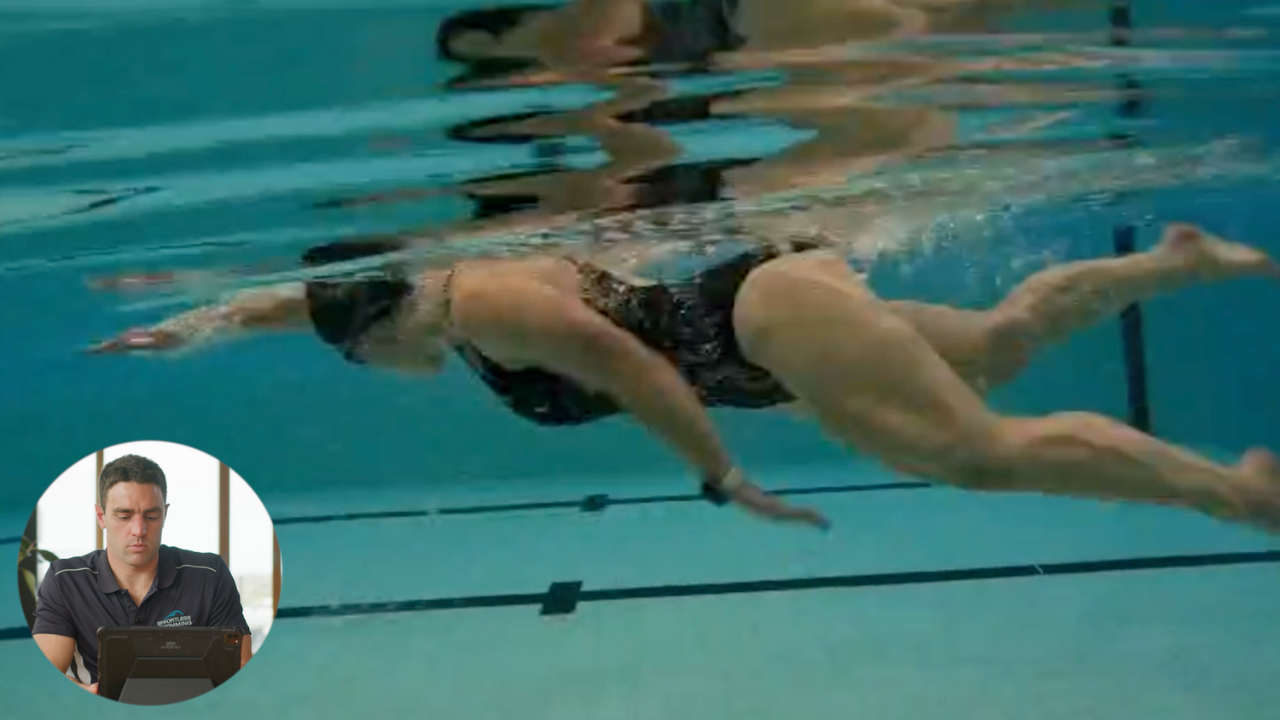

Here we look at a triathlete with good rhythm and cadence. Some of the things he can do to improve his stroke are:
– Reduce his upper body rotation (especially on the breathing strokes)
– Reduce the power in his catch phase and work closer to a high elbow position
– Keep his head centered when breathing instead of shifting off to the side
Transcription:
Hey, Brenton here. Welcome to Feedback Friday. In these episodes, this is where we look at someone swimming, and we look at the two to three things that they can focus on over the course of three to six months, which will help them swim faster.
Now, in this video, we’ve got a triathlete who typically does Olympic distance triathlons. His 1500-meter swim is around 30 minutes, so it’s around that two minute pace. So, let’s have a look and see what are some things that this athlete could change and focus on in his stroke, to bring that down towards somewhere around 28, 27 minutes, and faster than that, over the course of the next six to 12 months.
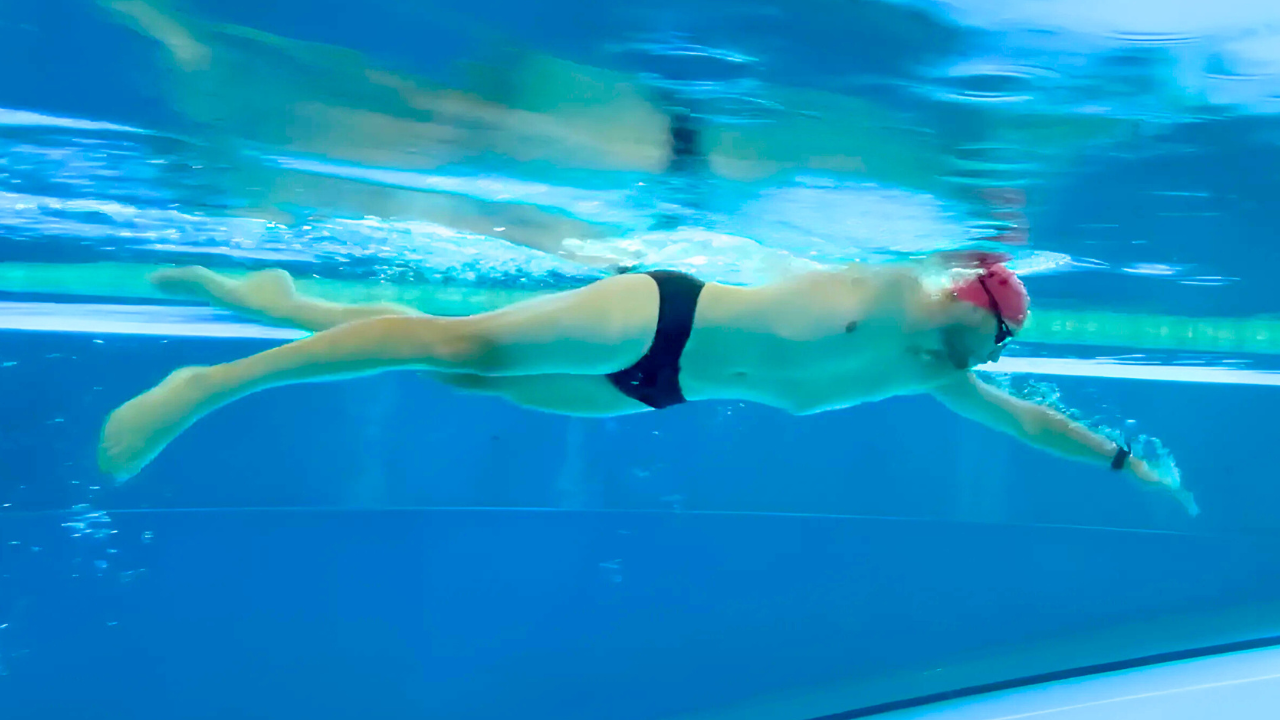
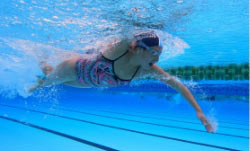
So, the first thing that we normally like to look at is body position and posture, and head position. So, if we have a look at that through here, you’ll see that through some parts of his stroke, the head actually goes quite deep. So, you’ll see there that the eyes are almost looking behind him, and the whole head goes under the water. What I normally like to aim for, and you see this with most top swimmers, is the top of their head will typically stay above the water. Now yes, some swimmers will sort of duck their head under if they’ve got more of a loping sort of stroke, but typically, for most triathletes, I like to see them looking somewhere slightly forwards, keeping the top of their head above the water.
Now, one of the reasons for that is, if your head is completely submerged, you’ve then got to lift the head up, and sometimes even turn it further to get your breath, if you’re having to come from under the water. So, that’s why I find it helpful to look slightly further forwards and keep that out. The other thing, as well, and this is something that Amy Jones talks a lot about, is in terms of awareness in the open water, if you are looking straight down, you don’t have much awareness about what’s happening out in front of you. So, most triathletes and open water swimmers are better off looking slightly further forwards, to give themselves the awareness about what’s out in front of them, whether it’s other swimmers, whether it is things in the water, so I find that to be quite helpful.
But the other thing that it can really help with is your posture. So, if you’re ducking your head down too deep, often, it can put you in this rounded shoulders, hunched over sort of posture, and when you’re in that kind of posture, it’s very hard to use the stronger muscles through the shoulder. And we normally find that the lats aren’t often engaged very well, the lower traps as well, rhomboids aren’t really being used. It tends to be more through the pecs, which yes, you’ll want to be using, but it tends to be more sort of pecs and upper shoulders through here. And it just doesn’t quite give you the same power for the amount of effort that you’re putting in. So that’s why we generally want to try and look somewhere around here. So that’d be the first thing I’d look to adjust, is just get that head position sorted.
The second thing, and you’ll notice this as he’s swimming through, there’s quite a bit of movement through the hips and through the body. There’s quite a bit of sort of side to side snaky movement, as you can see through here, and the legs do kick out quite wide. As we slow it down, so you can really see that the legs are kicking out really wide there. So, what we can look at there is, all right, how much is this swimmer rotating through their hips and through their shoulders? And if we get an angle on this, you’ll notice that… I think that’s about right, maybe 53. I’ll just check it from a better angle, but this swimmer just seems to be rotating too far through the shoulders.
What I normally like to sort of see here is around 40 to 45 degrees rotation. The swimmer is roughly about 80 degrees, maybe a little bit less there, but side to side, it’s really a roll side to side, and you can see how far the hips are turning, how far the shoulders are turning, and it’s really throwing his balance out in the stroke, and that’s often when we see the legs splay.
So, if this swimmer is able to control his rotation a little bit more, bringing it back to that 40, 45 degrees, making it more of that rock side to side, rather than a roll, like Karlyn Pipes likes to talk about, more of a rock than a roll, then that is going to give him much better control through the stroke. It’s going to help him improve his catch because his shoulders won’t be in such an uncomfortable position. Because when you rotate that far, it’s a lot of strain on the shoulder for it to be in a good high elbow catch position there, just because of the position of the shoulder there. Whereas if he brings it back to say, that 45 degrees rotation, it’s not as much strain for the shoulder to get a really good catch there.
So, it’s going to help with a lot of aspects of the stroke, but probably more importantly, it’ll help him keep the hips, the upper body, in this one straight align, a little bit more tautness through there, and that will make a big difference with helping him just cut through the water a lot easier, keep that little bit of tautness through the center, which allows him to connect his catch with his rotation, and his kick.
So, that’d be the first three things, and that might take him a good four to six weeks to really get the feel for, but it is worth doing, because from that baseline, from that platform of having good stability and control, and good head position, you can then really work on having an effective kick, and an effective catch and pull.
The other thing you’ll see when we look from above, there is a bit of crossover happening in the stroke, as you can see there. So, when we look from above, we think of those imaginary train tracks in line with the shoulders. We want the hands to be running directly in line with the shoulders there when the hands enter. So, you’ll notice that the right-hand does come across the center, and that might be, in part, due to that over-rotation, but there’s a good chance… That one’s not too bad. There’s a good chance, just in general, he is just crossing into the center. So, he might mean it to feel as though he’s out relatively wide to get on those train tracks.
Now, the other thing you will notice here is that, with his recovery, he comes very close to the body with the arm. So, if we look at right where his hand is, it’s quite jammed up through the shoulders in that recovery. So what I normally like to aim for, for a lot of swimmers, is having more of an open recovery. Nothing wrong with getting your hand out a little bit wider in the recovery, and having the arm in a more comfortable and more natural position. Because if you’re trying to recover through here with the hand very close, that can be a lot of strain on the shoulder. And when we swim, we want to stay in natural positions, or fairly natural positions, because it’s going to be a lot more comfortable. It’s going to be a lot more sustainable over distance, and generally, you can keep a much better rhythm and momentum that way, as opposed to if you’re going into positions that are a bit uncomfortable.
And this, for a lot of people, is uncomfortable because of that strain on the shoulder. So, what I’d encourage him to do is just have a slightly wider recovery there. Now again, making this change, he’s probably going to have to feel like he’s very wide, very open, even sort of straight with that arm, to make that change because, with a lot of the things that we do when we swim, they’ve got to be exaggerated to be changed.
So that’d be the real sort of key things I’d start with, and that could be a good couple of months worth of practice to get them in place of where we want them to be. Now after that, I’d probably look to work on the catch and the pull. Now, some aspects of the catch and the pull that he may want to work on, the first one will just be in this reach and extension phase as he’s about to start the catch. Pretty good position. The only thing you’ll notice there is the fingertips are sort of pointing upwards and the wrist is dropped.
What we want to try and do there is keep the fingers below the wrist, wrist below the elbow, and just avoid dropping the wrists, having that bend in the wrists there because it just means less surface area with the head and forearm, and we often find that, if that wrist is bent, then it’s pretty common to be pressing down on the water.
So, as he goes through here, you’ll see that the fingertips continue to face forwards for quite a while, so his fingertips are still facing forwards. If you can just point them down a little bit more and get to this sort of position, this right here is going to be a lot more surface area that’s pressing back, which will help moving forward, as opposed to having this pressing downwards. So, we’d want to work on that, getting the fingertips to point down a little bit more.
And then on this left hand side, nice position here that he’s in. Now, as he goes through this part, you’ll see that it’s that slightly dropped elbow catch position. So, the way we determine it is, if we draw a line from his shoulder to his hand, that elbow, if it’s below that line, then we consider that dropping the elbow. If we have that elbow above that straight line, we consider that a high elbow catch, which is what we want to work towards.
So, we’d want to look at improving the catch in the pool, probably with the YMCA drill progression that you’ve probably seen in some past videos, and we have inside the video membership. That’s probably the best way for him to make those changes.
Now, another thing that will probably help him make those changes is, I would back off some of that power that he’s applying at the start. You’ll see that the reach and extension phase is good there, where he’s fairly relaxed, but it looks like he’s pulling pretty hard. He’s applying a lot of power straight away here. But the catch from there to there, that’s the setup phase. You do not need to apply power in that part of the stroke. Just turn down the effort to a 3 out of 10 instead of an 8 or a 9 out of 10. Use that to just set yourself up in a good position, but do not look to pull really hard there. Just get a good setup, a good position, then you can start to increase the speed and the power as you go through there.
But again, we never want to force it to the point where we’re just slipping through the water, because at the point where you slip, then you’d lose that pressure, you lose that hold of the water, and that’s when you lose the effectiveness of your catching your pool. So, quite often, when I’m working with swimmers in clinics and campuses, they actually need to turn down the effort and the power that they’re putting into the catch and the pull, because they’re actually slipping through the water, and for less effort, they can actually go faster. So, it’s a little bit of a different way of thinking about swimming and about approaching your stroke, but it can actually make a big, big difference. So I’d get him to relax, slow down a little bit at the start there, and he’ll probably find himself swimming a bit faster that way.
Now, the very last thing that you’ll see here, is that he is pressing back a long way, so he could probably make the stroke a little bit shorter out the back. If we look at where that hand is existing, it’s almost towards his knee, and that arms almost straight when he finishes out the back there. So, he might just be trying to press back a little bit too far. I’d aim to exit the water about here, coming out there, instead of there. So, he could make the stroke a little bit shorter out the back. Keep the length out at the front. That seems all right. But some of that might change anyway, when he’s reducing his hip and upper body rotation, and just controlling that a little bit more.
So, if you did enjoy this video, then please like and subscribe, and let me know if there’s anything else that you can see in the video in the comments below. And we do this on a regular basis. So, the way that I can help you, we do this at clinics, which we run clinics around Australia. We’ve got a whole bunch of camps coming up next year in 2020, in Australia, Thailand, and Hawaii. And I also do online coaching, where you can send in your videos for regular stroke analysis, and I’ll provide the link to all of those things below. So, thanks for watching and I’ll see you next week for another episode of Feedback Friday.